
添加播放器
- 首先安装 aplater 插件如果使用插件,在markdown中要这样写
npm install --save hexo-tag-aplayer
如果我們不想使用插件,就需要在markdown中用html的格式書寫,同時把主題配置文件中的 aplayerInject 開啟{% meting "000PeZCQ1i4XVs" "tencent" "artist" "theme:#3F51B5" "mutex:true" "preload:auto" %}
<div class="aplayer" data-id="000PeZCQ1i4XVs" data-server="tencent" data-type="artist" data-mutex="true" data-preload="auto" data-theme="#3F51B5"></div>
- (需要安装插件)由於需要全局都插入aplayer和meting資源,為了防止插入重複的資源,需要把asset_inject設為false
在Hexo的配置文件中
aplayer: |
在主題的配置文件中,enable設為true和per_page設為true
# Inject the css and script (aplayer/meting) |
把aplayer代碼插入到主題配置文件的inject.bottom去
inject:
head:
bottom:
 - <div class="aplayer no-destroy" data-id="440999611" data-server="netease" data-type="playlist" data-fixed="true" data-mini="true" data-listFolded="false" data-order="random" data-preload="none" data-autoplay="true" muted></div>
運行Hexo就可以看到網頁左下角出現了Aplayer
最後,如果你想切換頁面時,音樂不會中斷。請把主題配置文件的pjax設為true
转自 butterfly
鼠标样式修改
body { |
把代码复制到自己的css文件引入即可。。
也可以用自己喜欢的样式,取代里面的连接….
头像撒花
把下面css引入即可
/* 头像撒花 */ |
移动端优化
引入css文件即可
/*移动端优化:去除归档、标签、最新文章、公告、评论、只保留网站统计*/ |
网站标题,文字等彩虹色
引入css文件即可
/*彩虹文字*/ |
字体的修改引入
下载自己喜欢的文字引入,不限于woff2..其他也可
/*字体*/ |
代码的文字字体
/*代码文字*/ |
底部信息
在主题的配置文件中写入
footer: |
然后引入css
|
侧边滚动条美化
引入css代码
|
基于Butterfly主题的分类磁铁 (首页的六格分类)
- 在开始一切工作之前,先确保你有 6 篇不同 categories 的文章。如果,没有的话需要新建示例文章。
前往”根目录\themes\butterfly\layout”文件夹,将”index.pug”复制并重命名为”index-re.pug”作为备份。
打开”index.pug”按照以下代码进行修改。修改的起始点为”#recent-posts.recent-posts”终点为”+postUI”。
你可以直接将以下代码放入进行替换。extends includes/layout.pug
block content
include ./includes/mixins/post-ui.pug
#recent-posts.recent-posts
.recent-post-item(style='width:100%;height:auto;float:left;padding:5px;flex-wrap:wrap;justify-content : center;flex-direction: row; ')
figure.gallery-group#color-card
img.gallery-group-img.loaded(src='https://cdn.jsdelivr.net/gh/flurrychan/cdn/img/hexo/emoji/1.png',alt='图片',data-ll-status='loaded')
figcaption(style='background-image: linear-gradient(to bottom,rgba(0, 0, 0, 0.4) 25%,rgba(16,16,16,0) 100%')
.gallery-group-name(style='font-size: 1rem;') hexo
p 关于hexo的使用跟方法
a(href='/categories/hexo/') 关于hexo的使用跟方法
figure.gallery-group#color-card
img.gallery-group-img.loaded(src='https://cdn.jsdelivr.net/gh/flurrychan/cdn/img/hexo/emoji/2.png',alt='图片', data-ll-status='loaded')
figcaption(style='background-image: linear-gradient(to bottom,rgba(0, 0, 0, 0.4) 25%,rgba(16,16,16,0) 100%')
.gallery-group-name(style='font-size: 1rem;') sakura
p sakura, 桜いろ主题的魔改
a(href='categories/sakura/') sakura, 桜いろ主题的魔改
figure.gallery-group#color-card
img.gallery-group-img.loaded(src='https://cdn.jsdelivr.net/gh/flurrychan/cdn/img/hexo/emoji/3.png',alt='图片', data-ll-status='loaded')
figcaption(style='background-image: linear-gradient(to bottom,rgba(0, 0, 0, 0.4) 25%,rgba(16,16,16,0) 100%')
.gallery-group-name(style='font-size: 1rem;') 桜いろ
p wordpress + 桜いろ 的安装跟使用教程
a(href='categories/sakurairo/') wordpress + 桜いろ 的安装跟使用教程
figure.gallery-group#color-card
img.gallery-group-img.loaded(src='https://cdn.jsdelivr.net/gh/flurrychan/cdn/img/hexo/emoji/4.png',alt='图片',data-ll-status='loaded')
figcaption(style='background-image: linear-gradient(to bottom,rgba(0, 0, 0, 0.4) 25%,rgba(16,16,16,0) 100%')
.gallery-group-name(style='font-size: 1rem;') wordpress
p wordpress的一些通用方法
a(href='categories/wordpress/') wordpress的一些通用方法
figure.gallery-group#color-card
img.gallery-group-img.loaded(src='https://cdn.jsdelivr.net/gh/flurrychan/cdn/img/hexo/emoji/5.png',alt='图片', data-ll-status='loaded')
figcaption(style='background-image: linear-gradient(to bottom,rgba(0, 0, 0, 0.4) 25%,rgba(16,16,16,0) 100%')
.gallery-group-name(style='font-size: 1rem;') 其他
p 其他的一些使用
a(href='categories/其他/') 记录一下日常
figure.gallery-group#color-card
img.gallery-group-img.loaded(src='https://cdn.jsdelivr.net/gh/flurrychan/cdn/img/hexo/emoji/6.png',alt='图片', data-ll-status='loaded')
figcaption(style='background-image: linear-gradient(to bottom,rgba(0, 0, 0, 0.4) 25%,rgba(16,16,16,0) 100%')
.gallery-group-name(style='font-size: 1rem;') 日常
p 日常记录
a(href='categories/日常/') 日常
.recent-post-item(style='height:0px;clear:both;margin-top: 0px;')
+postUI
div!= list_categories()
include includes/pagination.pug添加自定义 css 代码文件
在 hexo 根目录”source”文件夹下新建”magnetcss”文件夹,在”\source\magnetcss”路径下新建”magnet.css”
填入以下代码后保存。或引入自定义css文件中。
.category-list-count:after { |
- 接入 CSS 样式和 JS 代码
打开”\themes\butterfly”路径下的”_config.yml”
搜索到”inject:”设置处
添加以下代码:
inject: |
本站打开了pjax,为了适配,我放进了js文件然后 data-pjax,下面是我的方式
bottom: |
重要,很多魔改需要jquery的引入。直接把jquery放在bottom: 下 第一个。。
bottom: |
转自 冰老师博客
基于Butterfly主题的轮播手动置顶文章
下载资源包
资源包- 增加、替换代码
前往”根目录\themes\butterfly\layout”文件夹
将资源包中的”sliderbar.pug”复制到文件夹中。
将”index.pug”复制并重命名为”index-re.pug”作为备份。
将资源包 pug 文件夹的 Original 中的”index.pug”覆盖进行替换。
或者打开”index.pug”按照以下代码进行修改。修改的起始点为”#recent-posts.recent-posts”。
extends includes/layout.pug |
- 添加引入 js、css 代码
打开”\themes\butterfly”路径下的”_config.yml”
搜索到”inject:”设置处
添加以下代码:
inject: |
- 配置置顶
首先这次需要对 pug 进行修改,打开”sliderbar.pug”。
其中以下代码部分为主要修改项。默认展示五个,你可以通过复制这段代码增加展示的个数。
.blog-slider__item.swiper-slide(style='width: 750px; opacity: 1; transform: translate3d(0px, 0px, 0px); transition-duration: 0ms;') |
转自 冰老师博客
Valine 评论添加 [博主,小伙伴,访客] 标签
修改步骤
- 打开 [Blogroot]\themes\butterfly\layout\includes\third-party\comments\valine.pug, 按指示添加如下字段。
      serverURLs: '#{theme.valine.serverURLs}',
      emojiCDN: '#{theme.valine.emojiCDN}',
      emojiMaps: !{emojiMaps},
      enableQQ: #{theme.valine.enableQQ},
      path: window.location.pathname,
+     master: '#{theme.valine.master}'.split(','),
+     friends: '#{theme.valine.friends}'.split(','),
+     tagMeta: '#{theme.valine.tagMeta || "博主,小伙伴,访客"}'.split(',')
} - 打开 [Blogroot]_config.butterfly.yml,
- 在 valine 配置项添加如下内容。
md5 加密可以使用在线转码,务必使用 32位[小] 进行转码。# valine
# https://valine.js.org
valine:
appId: # leancloud application app id
appKey: # leancloud application app key
pageSize: 10 # comment list page size
avatar: monsterid # gravatar style https://valine.js.org/#/avatar
lang: zh-CN # i18n: zh-CN/zh-TW/en/ja
placeholder: # valine comment input placeholder (like: Please leave your footprints)
guest_info: nick,mail,link # valine comment header info (nick/mail/link)
recordIP: false # Record reviewer IP
serverURLs: https://???????.api.lncldglobal.com # This configuration is suitable for domestic custom domain name users, overseas version will be automatically detected (no need to manually fill in)
bg: # valine background
emojiCDN: # emoji CDN
enableQQ: true # enable the Nickname box to automatically get QQ Nickname and QQ Avatar
requiredFields: nick,mail # required fields (nick/mail)
+ master: # md5加密后的博主邮箱
+ - d4e7????4d361ad7????44a14e9e2a94 #可添加多个
+ friends: # md5加密后的小伙伴邮箱
+ - 5c?????bfe6rfc72a????e268ad3819c #可添加多个
+ - 7c?????bfe65fc02a????e2????3919c
+ tagMeta: '博主,小伙伴,访客' # 标签要显示的文字,默认'博主,小伙伴,访客' - 在 CDN 配置项添加如下内容。将 Valine.min.js 替换成 HCLonely 魔改的版本
    CDN:
      # main
      main_css: /css/index.css
      jquery: https://cdn.jsdelivr.net/npm/jquery@latest/dist/jquery.min.js
      main: /js/main.js
      utils: /js/utils.js
      # pjax
      pjax: https://cdn.jsdelivr.net/npm/pjax/pjax.min.js
      # comments
      gitalk: https://cdn.jsdelivr.net/npm/gitalk@latest/dist/gitalk.min.js
      gitalk_css: https://cdn.jsdelivr.net/npm/gitalk/dist/gitalk.min.css
-     valine: https://cdn.jsdelivr.net/npm/valine/dist/Valine.min.js
+     valine: https://cdn.jsdelivr.net/gh/HCLonely/Valine@latest/dist/Valine.min.js
- 以上步骤完成后,已经可以看到实现效果了。更多内容还请自行下载 Valine.min.js 源码进行修改。
转自aki大佬
留言板动态弹出信封样式
效果请看留言板
修改步骤
- 新建留言板页面(已有的不用重复操作。)
在 [Blogroot] 打开终端,输入hexo new page comments
- 打开 [Blogroot]\source\comments\index.md
将其内容修改为:---
title: 留言板
top_img:
---
<link rel="stylesheet" href="/css/commentsbar.css"/>
<div id="computer">
<div id="maincontent"><br>
<div id="form-wrap"><img src="https://cdn.jsdelivr.net/gh/Akilarlxh/Valine-Admin@v1.0/source/img/before.png" id="beforeimg">
<div id="envelope">
<form>
<div class="formmain">
<img class="headerimg" src="https://ae01.alicdn.com/kf/U5bb04af32be544c4b41206d9a42fcacfd.jpg"/>
<div style="padding: 5px 20px;">
<center>
<h3 calss="title3">来自Akilar的留言:</h3>
</center>
<center class="comments">
有什么想问的?<br>
有什么想说的?<br>
有什么想吐槽的?<br>
哪怕是有什么想吃的,都可以告诉我哦~<br>
</center>
<div class="bottomcontent">
<img class="bottomimg" src="https://ae01.alicdn.com/kf/U0968ee80fd5c4f05a02bdda9709b041eE.png"/>
</div>
<p class="bottomhr">自动书记人偶竭诚为您服务!</p>
</div>
</div>
</form>
</div><img id="afterimg" src="https://cdn.jsdelivr.net/gh/Akilarlxh/Valine-Admin@v1.0/source/img/after.png">
</div>
</div>
</div>
<div id="mobile">
<form>
<div class="formmain"><img class="headerimg" src="https://ae01.alicdn.com/kf/U5bb04af32be544c4b41206d9a42fcacfd.jpg" />
<div style="padding: 5px 20px;">
<center>
<h3 class="title3">来自Akilar的留言:</h3>
</center>
<center class="comments">
有什么想问的?<br>
有什么想说的?<br>
有什么想吐槽的?<br>
哪怕是有什么想吃的,都可以告诉我哦~<br>
</center>
<div class="bottomcontent"><img src="https://ae01.alicdn.com/kf/U0968ee80fd5c4f05a02bdda9709b041eE.png" class="bottomhr"></div>
<p class="bottomhr"">自动书记人偶竭诚为您服务!</p>
</div>
</div>
</form>
</div> - 在 [Blogroot]\themes\butterfly\source\css\ 目录下新建 commentsbar.css完成! 本文转自aki大佬
/* 滚动条隐藏 */
::-webkit-scrollbar {
display: none;
}
/* 禁用图片点击,butterfly渲染后会给图片套上fancybox,点开后会造成信笺偏移*/
.fancybox{
pointer-events: none;
}
/* top-img隐藏 */
#page-header {
background: transparent ;
}
/* 宽度小于530px隐藏信封 */
@media screen and (max-width: 530px) {
#computer {
display: none ;
}
}
@media screen and (min-width: 530px) {
#mobile {
display: none ;
}
}
#article-container img {
margin: 0 auto 0rem;
}
#form-wrap {
overflow: hidden;
height: 447px;
position: relative;
top: 0px;
transition: all 1s ease-in-out .3s;
z-index: 0;
}
/* 调整信封划出高度,换信笺内容以后可在此设置height */
#form-wrap:hover {
height: 1050px;
top: -200px;
}
#beforeimg {
position: absolute;
bottom: 126px;
left: 0px;
background-repeat: no-repeat;
width: 530px;
height: 317px;
z-index: -100;
pointer-events: none;
}
#afterimg {
position: absolute;
bottom: -2px;
left: 0;
background-repeat: no-repeat;
width: 530px;
height: 259px;
z-index: 100;
pointer-events: none;
}
#envelope {
position: relative;
overflow: visible;
width: 500px;
margin: 0px auto;
transition: all 1s ease-in-out .3s;
padding-top: 200px;
}
#maincontent {
width: 530px;
margin: 20px auto 0;
}
.headerimg {
width: 100%;
overflow: hidden;
pointer-events: none;
}
.formmain {
background: white;
width: 95%;
max-width: 800px;
margin: auto auto;
border-radius: 5px;
border: 1px solid;
overflow: hidden;
-webkit-box-shadow: 0px 0px 20px 0px rgba(0, 0, 0, 0.12);
box-shadow: 0px 0px 20px 0px rgba(0, 0, 0, 0.18);
}
.title3 {
text-decoration: none;
color: rgb(246, 214, 175);
}
.comments {
border-bottom: #ddd 1px solid;
border-left: #ddd 1px solid;
padding-bottom: 20px;
background-color: #eee;
margin: 15px 0px;
padding-left: 20px;
padding-right: 20px;
border-top: #ddd 1px solid;
border-right: #ddd 1px solid;
padding-top: 20px;
font-family: "Arial", "Microsoft YaHei", "黑体", "宋体", sans-serif;
}
.bottomcontent {
text-align: center;
margin-top: 40px;
}
.bottomimg {
width: 100%;
margin: 5px auto 5px auto;
display: block;
pointer-events: none;
}
.bottomhr {
font-size: 12px;
text-align: center;
color: #999;
}
/* 夜间模式 */
[data-theme='dark']
.formmain {
background: rgb(50, 50, 50);
}
[data-theme='dark']
.comments {
background: rgba(90, 90, 90, 0.8)
}
右键菜单
- 在 [Blogroot]\themes\butterfly\layout\includes\third-party\ 目录下新建 galmenu.pug 文件。注意缩进。
.GalMenu.GalDropDown
  #gal.circle
    .ring
      a.menuItem(href='javascript:void(0);' onclick='Mirror()')
        span=theme.GalMenu.MenuItem.item1
      a.menuItem(href=url_for(theme.GalMenu.MenuItem.link2))
        span=theme.GalMenu.MenuItem.item2
      a.menuItem(href=url_for(theme.GalMenu.MenuItem.link3))
        span=theme.GalMenu.MenuItem.item3
      a.menuItem(href=url_for(theme.GalMenu.MenuItem.link4))
        span=theme.GalMenu.MenuItem.item4
      a.menuItem(href=url_for(theme.GalMenu.MenuItem.link5))
        span=theme.GalMenu.MenuItem.item5
      a.menuItem(href=url_for(theme.GalMenu.MenuItem.link6))
        span=theme.GalMenu.MenuItem.item6
  if theme.GalMenu.audio
    if theme.GalMenu.music
      audio#audio(src=url_for(theme.GalMenu.music))
    else
      audio#audio(src='https://cdn.jsdelivr.net/gh/Akilarlxh/Akilarlxh.github.io@bf_3.3.0_12/music/galmenu.mp3')
script(defer src='https://cdn.jsdelivr.net/gh/Akilarlxh/Akilarlxh.github.io@bf_3.3.0_12/js/custom/galmenu.min.js') - 修改 [Blogroot]\themes\butterfly\layout\includes\additional-js.pug 文件,在末尾添加内容(注意缩进):
      if theme.pjax.enable
        !=partial('includes/third-party/pjax', {}, {cache:theme.fragment_cache})

      !=partial('includes/third-party/baidu_push', {}, {cache:theme.fragment_cache})

+     if theme.GalMenu.enable
+ !=partial('includes/third-party/galmenu', {}, {cache:theme.fragment_cache}) - 在 [Blogroot]\themes\butterfly\source\css\layout\ 目录下新建 galmenu.styl 文件。此处开头是默认图标配置。可以在配置项里更换自己喜欢的图标。
$menu-icon1 = hexo-config('GalMenu.enable') && hexo-config('GalMenu.MenuItem.icon1') ? unquote(hexo-config('GalMenu.MenuItem.icon1')) : url('https://cdn.jsdelivr.net/gh/Akilarlxh/Akilarlxh.github.io@v3.3.3_3/galmenu/home.png')
$menu-icon2 = hexo-config('GalMenu.enable') && hexo-config('GalMenu.MenuItem.icon2') ? unquote(hexo-config('GalMenu.MenuItem.icon2')) : url('https://cdn.jsdelivr.net/gh/Akilarlxh/Akilarlxh.github.io@v3.3.3_3/galmenu/archive.png')
$menu-icon3 = hexo-config('GalMenu.enable') && hexo-config('GalMenu.MenuItem.icon3') ? unquote(hexo-config('GalMenu.MenuItem.icon3')) : url("https://cdn.jsdelivr.net/gh/Akilarlxh/Akilarlxh.github.io@v3.3.3_3/galmenu/tag.png")
$menu-icon4 = hexo-config('GalMenu.enable') && hexo-config('GalMenu.MenuItem.icon4') ? unquote(hexo-config('GalMenu.MenuItem.icon4')) : url('https://cdn.jsdelivr.net/gh/Akilarlxh/Akilarlxh.github.io@v3.3.3_3/galmenu/random.png')
$menu-icon5 = hexo-config('GalMenu.enable') && hexo-config('GalMenu.MenuItem.icon5') ? unquote(hexo-config('GalMenu.MenuItem.icon5')) : url('https://cdn.jsdelivr.net/gh/Akilarlxh/Akilarlxh.github.io@v3.3.3_3/galmenu/link.png')
$menu-icon6 = hexo-config('GalMenu.enable') && hexo-config('GalMenu.MenuItem.icon6') ? unquote(hexo-config('GalMenu.MenuItem.icon6')) : url('https://cdn.jsdelivr.net/gh/Akilarlxh/Akilarlxh.github.io@v3.3.3_3/galmenu/comment.png')

.GalMenu
  margin 0
  padding 0
  display none
  position fixed
  z-index 999
  a
    text-decoration none
    outline 0
  .circle
    margin 0 auto
  .ring
    border-radius 50%
    opacity 0
    -webkit-transform-origin 50% 50%
    -moz-transform-origin 50% 50%
    transform-origin 50% 50%
    -webkit-transform scale(0.1) rotate(-270deg)
    -moz-transform scale(0.1) rotate(-270deg)
    -transform scale(0.1) rotate(-270deg)
    -webkit-transition all 0.4s ease-out
    -moz-transition all 0.4s ease-out
    transition all 0.4s ease-out
    a
      display inline-block
      color #ffffff
      text-shadow #DC965A 1px 0 0,#DC965A 0 1px 0,#DC965A -1px 0 0,#DC965A 0 -1px 0
      -webkit-text-shadow #DC965A 1px 0 0,#DC965A 0 1px 0,#DC965A -1px 0 0,#DC965A 0 -1px 0
      -moz-text-shadow #DC965A 1px 0 0,#DC965A 0 1px 0,#DC965A -1px 0 0,#DC965A 0 -1px 0
      *filter Glow(color=#DC965A,strength=1)
      &:nth-of-type(1)
        background-image $menu-icon1
      &:nth-of-type(2)
        background-image $menu-icon2
      &:nth-of-type(3)
        background-image $menu-icon3
      &:nth-of-type(4)
        background-image $menu-icon4
      &:nth-of-type(5)
        background-image $menu-icon5
      &:nth-of-type(6)
        background-image $menu-icon6
      &:hover
        text-shadow #66CCFF 1px 0 0,#66CCFF 0 1px 0,#66CCFF -1px 0 0,#66CCFF 0 -1px 0
        -webkit-text-shadow #66CCFF 1px 0 0,#66CCFF 0 1px 0,#66CCFF -1px 0 0,#66CCFF 0 -1px 0
        -moz-text-shadow #66CCFF 1px 0 0,#66CCFF 0 1px 0,#66CCFF -1px 0 0,#66CCFF 0 -1px 0
        *filter Glow(color=#66CCFF,strength=1)
  .open
    .ring
      opacity 1
      -webkit-transform scale(1) rotate(0)
      -moz-transform scale(1) rotate(0)
      -transform scale(1) rotate(0)
  .menuItem
    border-radius 50%
    color #eeeeee
    display block
    height 80px
    line-height 80px
    margin-left -41px
    margin-top -41px
    position absolute
    text-align center
    width 80px
    background-size 80px
    border 2px #b59494 solid
    box-shadow 0px 0px 15px #fff
    -webkit-box-shadow 0px 0px 15px #fff
    -moz-box-shadow 0px 0px 15px #fff
    &:hover
      box-shadow inset 0px 0px 80px #fff
      -webkit-box-shadow inset 0px 0px 80px #fff
      -moz-box-shadow inset 0px 0px 80px #fff

.GalMenu .circle,.ring
  height 300px
  position relative
width 300px - 在 [Blogroot]_config.butterfly.yml 添加如下配置项:
# 自定义右键菜单 |
进阶教程
添加浏览器动作
前进后退刷新返回顶部等动作直接修改配置项中的 link 即可实现。例如:
MenuItem: #菜单链接和标签配置 |
添加随机文章功能
- 在 [Blogroot]\scripts\ 目录下新建 random.js 文件:
hexo.extend.generator.register('random', function (locals) {
  const config = hexo.config.random || {}
  const posts = []
  for (const post of locals.posts.data) {
    if (post.random !== false) posts.push(post.path)
  }
  return {
    path: config.path || 'random/index.html',
    data: `<html><head><script>var posts=${JSON.stringify(posts)};window.open('/'+posts[Math.floor(Math.random() * posts.length)],"_self")</script></head></html>`
  }
}) - 使用 /random/ 即可访问随机文章。
MenuItem: #菜单链接和标签配置
  item1: 随机文章
  link1: /random/
  icon1:
添加镜像站跳转功能
- 在 [Blogroot]\themes\butterfly\source\js\ 目录下新建 mirror.js 文件,记得修改对应域名为你自己的:
function Mirror() {
  let pathname;
  let hostname;
  let url;
  pathname = window.location.pathname;
  hostname = window.location.hostname;
  // if (hostname === '域名,不带https://协议')
  if (hostname === 'akilar.top') { //如果是主站
    // url = "域名,带https://协议" + pathname;
    url = "https://akilar.gitee.io" + pathname; //就跳转到镜像站的同名页面
    window.alert("即将为您跳转至镜像站");
    window.location.href = url;
  }
  else if(hostname === 'akilar.gitee.io') {
    url = "https://akilar.top" + pathname;
    window.alert("当前为镜像站,即将返回主站");
    window.location.href = url;
  }
  else {
    window.alert("本地调试,无需跳转");
  }
} - 在 [Blogroot]_config.butterfly.yml 中引入 mirror.js
      inject:
        head:
        bottom:
+ - <script src="/js/mirror.js"></script> - 修改 [Blogroot]\themes\butterfly\layout\includes\third-party\galmenu.pug 文件转自aki大佬
    .ring
-     a.menuItem(href=url_for(theme.GalMenu.MenuItem.link1))
+     a.menuItem(href='javascript:void(0);' onclick='Mirror()')
基于Butterfly主题的友链魔改
魔改步骤
- 新建友链页面。
- 在 Hexo 博客根目录 [Blogroot] 下打开终端,输入 hexo new page link。
hexo new page link
- 打开 [Blogroot]\source\link\index.md, 添加一行 type: ‘link’:
---
title: link
date: 2020-12-01 22:19:45
type: 'link'
--- - 新建文件 [Blogroot]\source_data\link.yml, 没有_data 文件夹的话也请自己新建。以下是默认友链格式示例 。打开
[Blogroot]\source_data\link.yml,输入:- class_name: 糖果屋のVIP
class_desc: 售后服务享五折优惠2333
link_list:
- name: Akilar
link: https://akilar.top
avatar: https://akilar.top/img/siteicon/favicon.png
descr: 欢迎光临糖果屋
- class_name: killuaの博客
class_desc: 一个小破站
link_list:
- name: killua
link: https://aabbj.com
avatar: https://cdn.jsdelivr.net/gh/flurrychan/CDN/tx.jpg
descr: 一个小破站 - 添加 [Blogroot]_config.butterfly.yml 中 menu 配置项内 link 页面。
menu:
   Link: /link/ || fas fa-link
- 修改 [Blogroot]\themes\butterfly\layout\includes\page\flink.pug, 此处添加判断机制,使得可以通过修改配置文件来切换友链风格。
if (theme.flink_style === 'butterfly')
  .flink#article-container
    if site.data.link
      each i in site.data.link
        if i.class_name
          h2!= i.class_name
        if i.class_desc
          .flink-desc!=i.class_desc
        .flink-list
          each item in i.link_list
            .flink-list-item
              a(href=url_for(item.link)  title=item.name target="_blank")
                if theme.lazyload.enable
                  img(data-lazy-src=url_for(item.avatar) onerror=`this.onerror=null;this.src='` + url_for(theme.error_img.flink) + `'` alt=item.name )
                else
                  img(src=url_for(item.avatar) onerror=`this.onerror=null;this.src='` + url_for(theme.error_img.flink) + `'` alt=item.name )
                span.flink-item-name= item.name
                span.flink-item-desc(title=item.descr)= item.descr
    != page.content
else if (theme.flink_style === 'volantis')
  .flink#article-container
    if site.data.link
      each i in site.data.link
        if i.class_name
          h2!= i.class_name
        if i.class_desc
          .flink-desc!=i.class_desc
        .site-card-group
          each item in i.link_list
            a.site-card(target='_blank' rel='noopener' href=url_for(item.link))
              .img
                if theme.lazyload.enable
                  img(data-lazy-src=url_for(item.siteshot) onerror=`this.onerror=null;this.src='` + url_for(theme.error_img.post_page) + `'` alt='' )
                else
                  img(src=url_for(item.siteshot) onerror=`this.onerror=null;this.src='` + url_for(theme.error_img.flink) + `'` alt='' )
              .info
                if theme.lazyload.enable
                  img(data-lazy-src=url_for(item.avatar) onerror=`this.onerror=null;this.src='` + url_for(theme.error_img.flink) + `'` alt='' )
                else
                  img(src=url_for(item.avatar) onerror=`this.onerror=null;this.src='` + url_for(theme.error_img.flink) + `'` alt='' )
                span.title= item.name
                span.desc(title=item.descr)= item.descr
!= page.content- 修改 [Blogroot]\themes\butterfly\source\css_page\flink.styl
    if hexo-config('flink_style') == 'butterfly'
  .flink#article-container
    .flink-desc
      margin: .2rem 0 .5rem

    .flink-list
      overflow: auto
      padding: 10px 10px 0
      text-align: center

      & > .flink-list-item
        position: relative
        float: left
        overflow: hidden
        margin: 15px 7px
        width: calc(100% / 3 - 15px)
        height: 90px
        border-radius: 8px
        line-height: 17px
        -webkit-transform: translateZ(0)

        +maxWidth1024()
          width: calc(50% - 15px) !important

        +maxWidth600()
          width: calc(100% - 15px) !important

        &:hover
          img
            transform: rotate(360deg)

        &:before
          position: absolute
          top: 0
          right: 0
          bottom: 0
          left: 0
          z-index: -1
          background: var(--text-bg-hover)
          content: ''
          transition: transform .3s ease-out
          transform: scale(0)

        &:hover:before,
        &:focus:before,
        &:active:before
          transform: scale(1)

        a
          color: var(--font-color)
          text-decoration: none

          img
            float: left
            margin: 15px 10px
            width: 60px
            height: 60px
            border-radius: 35px
            transition: all .3s

          .img-alt
            display: none

          .flink-item-name
            @extend .limit-one-line
            display: block
            padding: 16px 10px 0 0
            height: 40px
            font-weight: bold
            font-size: 1.43em

          .flink-item-desc
            @extend .limit-one-line
            display: block
            padding: 16px 10px 16px 0
            height: 50px
            font-size: .93em
else if hexo-config('flink_style') == 'volantis'
  trans($time = 0.28s)
    transition: all $time ease
    -moz-transition: all $time ease
    -webkit-transition: all $time ease
    -o-transition: all $time ease
  .site-card-group
    display: flex
    flex-wrap: wrap
    justify-content: flex-start
    margin: -0.5 * 16px
    align-items: stretch
  .site-card
    margin: 16px * 0.5
    width: "calc(100% / 4 - %s)" % 16px
    @media screen and (min-width: 2048px)
        width: "calc(100% / 5 - %s)" % 16px
    @media screen and (max-width: 768px)
        width: "calc(100% / 3 - %s)" % 16px
    @media screen and (max-width: 500px)
        width: "calc(100% / 2 - %s)" % 16px
    display: block
    line-height: 1.4
    height 100%
    .img
      width: 100%
      height 120px
      @media screen and (max-width: 500px)
        height 100px
      overflow: hidden
      border-radius: 12px * 0.5
      box-shadow: 0 1px 2px 0px rgba(0, 0, 0, 0.2)
      background: #f6f6f6
      img
        width: 100%
        height 100%
        // trans(.75s)
        transition: transform 2s ease
        object-fit: cover

    .info
      margin-top: 16px * 0.5
      img
        width: 32px
        height: 32px
        border-radius: 16px
        float: left
        margin-right: 8px
        margin-top: 2px
      span
        display: block
      .title
        font-weight: 600
        font-size: $fontsize-list
        color: #444
        display: -webkit-box
        -webkit-box-orient: vertical
        overflow: hidden
        -webkit-line-clamp: 1
        trans()
      .desc
        font-size: $fontsize-footnote
        word-wrap: break-word;
        line-height: 1.2
        color: #888
        display: -webkit-box
        -webkit-box-orient: vertical
        overflow: hidden
        -webkit-line-clamp: 2
    .img
      trans()
    &:hover
      .img
        box-shadow: 0 4px 8px 0px rgba(0, 0, 0, 0.1), 0 2px 4px 0px rgba(0, 0, 0, 0.1), 0 4px 8px 0px rgba(0, 0, 0, 0.1), 0 8px 16px 0px rgba(0, 0, 0, 0.1)
      .info .title
        color: #ff5722
- 修改 [Blogroot]\themes\butterfly\source\css_page\flink.styl
- 因为 Volantis 的 site-card 比 Butterfly 的 flink-card 多出了一个站点缩略图,所以需要再额外添加一条配置项。修改 [Blogroot]\source_data\link.yml, 添加一条名为 siteshot 的配置项。
- class_name: 糖果屋のVIP
  class_desc: 售后服务享五折优惠2333
  link_list:
    - name: Akilar
      link: https://akilar.top
      avatar: https://akilar.top/img/siteicon/favicon.png
      descr: 欢迎光临糖果屋
      siteshot: https://cdn.jsdelivr.net/gh/Akilarlxh/ScreenShot@gh-pages/akilar.top.jpg
      # siteshot就是站点缩略图的链接。
    - name: killuaの博客
      link: https://aabbj.com
      avatar: https://cdn.jsdelivr.net/gh/flurrychan/CDN/tx.jpg
      descr: 一个小破站
siteshot: https://cdn.jsdelivr.net/gh/flurrychan/ScreenShot@gh-pages/aabbj.com.jpg - 在 [Blogroot]_config.butterfly.yml 中添加配置项:
# 友链样式,butterfly为默认样式,volantis为站点卡片样式。
flink_style: volantis # butterfly | volantis - 站点卡片添加了懒加载和图片失效替换。对应配置项为 [Blogroot]_config.butterfly.yml 中的
# Replace Broken Images (替換無法顯示的圖片)
error_img:
  flink:   # 头像失效替换图
  post_page:  # 站点缩略图
站点图片批量半自动截图
使用方法
- 获取 Token,(此处直接使用当初为 github actions 教程准备的配图了)。
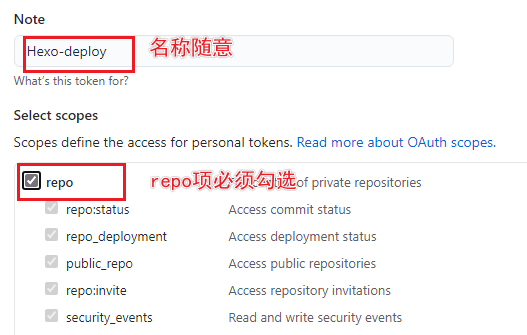
访问 Github-> 头像(右上角)->Settings->Developer Settings->Personal access tokens->generate new token, 创建的 Token 名称随意,但必须勾选 repo 项。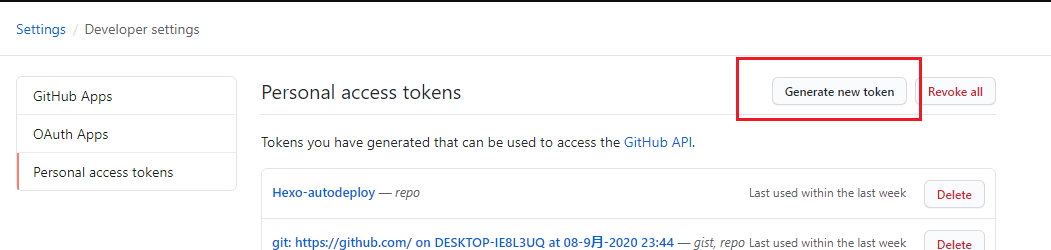
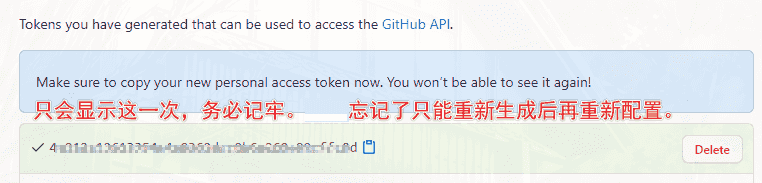
- token 只会显示这一次,之后将无法查看,所以务必保证你已经记录下了 Token。之后如果忘记了就只能重新生成重新配置了。
- 在你 fork 的项目仓库设置中,新建 secrets。变量名为 TOKEN,必须严格大写。

- 首先需要 clone 项目到本地。然后打开项目中的 ScreenShot.github\workflows\get.yml,
git clone git@github.com:[GithubUsername]/ScreenShot.git
按照示例添加你的友链地址。记得将 curl https://purge.jsdelivr.net/gh/[GithubUsername]/ScreenShot@gh-pages/. 中的 [GithubUsername] 改为你自己的 github 账号名。curl https://image.thum.io/get/width/400/crop/800/allowJPG/wait/20/noanimate/https://<YourDomain>/ -o <YourDoamin>.jpg
之后每次提交就会自动启动 github action,将图片下载到 ScreenShot 的 gh-pages 分支。并且通过 purge.jsdelivr.net 刷新缓存。
5. 最后,在友链配置中,就能用 https://cdn.jsdelivr.net/gh/[GithubUsername]/ScreenShot@gh-pages/[friend_link].jpg 来引用站点缩略图了。
- class_name: 糖果屋のVIP |
转自aki大佬博客
下雪效果
引入下面代码即可
inject:
 head:
 bottom:
    - <div><canvas id="snow" style="position:fixed;top:0;left:0;width:100%;height:100%;z-index:99999;pointer-events:none" width="1038" height="969"></canvas></div>
    - <script>var notMobile=!navigator.userAgent.match(/(phone|pad|pod|iPhone|iPod|ios|iPad|Android|Mobile|BlackBerry|IEMobile|MQQBrowser|JUC|Fennec|wOSBrowser|BrowserNG|WebOS|Symbian|Windows Phone)/i)</script>
    - <script async="" src="https://cdn.jsdelivr.net/gh/Candinya/Kratos-Rebirth@latest/source/js/snow.min.js"></script>
转自Ln’s Blog