如果你想你的网站快速被百度谷歌等搜寻网站快速收录,请根据这里的步骤手动提交。
站点地图sitemap 版本分为xml 版本和html 版本,sitemap xml 版本主要是提供给搜索引擎看得。而html 版本作用是提高用户体验,让用户一眼就能看清楚网站内容和分类。这篇文章主要教大家如何在不使用插件的情况下,纯代码制作网站地图。提交给搜索引擎!
一 制作html版本的站点地图
<?php
?>
<!DOCTYPE html PUBLIC "-//W3C//DTD XHTML 1.0 Transitional//EN" "http://www.w3.org/TR/xhtml1/DTD/xhtml1-transitional.dtd">
<html xmlns="http://www.w3.org/1999/xhtml">
<head profile="http://gmpg.org/xfn/11">
<meta http-equiv="Content-Type" content="text/html; charset=<?php bloginfo( 'charset' ); ?>" />
<title>站點地圖 - <?php bloginfo('name'); ?></title>
<meta name="keywords" content="站點地圖,<?php bloginfo('name'); ?>" />
<meta name="copyright" content="<?php bloginfo('name'); ?>" />
<link rel="canonical" href="<?php echo get_permalink(); ?>" />
<style type="text/css">
body {font-family: Microsoft Yahei,Verdana;font-size:13px;margin:0 auto;color:
a:link,a:visited {color:
a:hover {color:
h1,h2,h3,h4,h5,h6 {font-weight:normal;}
img {border:0;}
li {margin-top: 8px;}
.page {padding: 4px; border-top: 1px
.author {background-color:
</style>
</head>
<body vlink="#333333" link="#333333">
<h2 style="text-align: center; margin-top: 20px"><?php bloginfo('name'); ?>'s SiteMap </h2>
<center></center>
<div id="nav"><a href="<?php bloginfo('url'); ?>/"><strong><?php bloginfo('name'); ?></strong></a> » <a href="<?php echo get_permalink(); ?>">站點地圖</a></div>
<div id="content">
<h3>最新文章</h3>
<ul>
<?php
$previous_year = $year = 0;
$previous_month = $month = 0;
$ul_open = false;
$myposts = get_posts('numberposts=-1&orderby=post_date&order=DESC');
foreach($myposts as $post) :
?>
<li><a href="<?php the_permalink(); ?>" title="<?php the_title(); ?>" target="_blank"><?php the_title(); ?></a></li>
<?php endforeach; ?>
</ul>
</div>
<div id="content">
<li class="categories">分類目錄<ul>
<?php wp_list_categories('title_li='); ?>
</ul></li>
</div>
<div id="content">
<li class="categories">單面頁</li>
<?php wp_page_menu( $args ); ?>
</div>
<div id="footer">查看博客首頁: <strong><a href="<?php bloginfo('url'); ?>/"><?php bloginfo('name'); ?></a></strong></div><br />
<center>
<div style="text-algin: center; font-size: 11px"><strong><a href="http://www.timle.cn/sitemap_baidu.xml" target="_blank">Baidu-SiteMap</a></strong> Latest Update: <?php $last = $wpdb->get_results("SELECT MAX(post_modified) AS MAX_m FROM $wpdb->posts WHERE (post_type = 'post' OR post_type = 'page') AND (post_status = 'publish' OR post_status = 'private')");$last = date('Y-m-d G:i:s', strtotime($last[0]->MAX_m));echo $last; ?><br /><br /></div>
</center>
</body>
</html>
|
将上述文件保存为sitemap.php,上传到主题目录,打开wordpress后台,新建页面,模板选择”sitemap”,发布。记住这个页面的链接,将这个链接放到footer或者其它地方。
二 制作xml版本的站点地图
<?php
require('./wp-blog-header.php');
header("Content-type: text/xml");
header('HTTP/1.1 200 OK');
$posts_to_show = 1000;
echo '<?xml version="1.0" encoding="UTF-8"?>';
echo '<urlset xmlns="http://www.sitemaps.org/schemas/sitemap/0.9" xmlns:mobile="http://www.baidu.com/schemas/sitemap-mobile/1/">'
?>
<url>
<loc><?php echo get_home_url(); ?></loc>
<lastmod><?php $ltime = get_lastpostmodified(GMT);$ltime = gmdate('Y-m-d\TH:i:s+00:00', strtotime($ltime)); echo $ltime; ?></lastmod>
<changefreq>daily</changefreq>
<priority>1.0</priority>
</url>
<?php
/* 文章面頁 */
header("Content-type: text/xml");
$myposts = get_posts( "numberposts=" . $posts_to_show );
foreach( $myposts as $post ) { ?>
<url>
<loc><?php the_permalink(); ?></loc>
<lastmod><?php the_time('c') ?></lastmod>
<changefreq>monthly</changefreq>
<priority>0.6</priority>
</url>
<?php } /* 文章循環結束 */ ?>
<?php
/* 單面頁 */
$mypages = get_pages();
if(count($mypages) > 0) {
foreach($mypages as $page) { ?>
<url>
<loc><?php echo get_page_link($page->ID); ?></loc>
<lastmod><?php echo str_replace(" ","T",get_page($page->ID)->post_modified); ?>+00:00</lastmod>
<changefreq>weekly</changefreq>
<priority>0.6</priority>
</url>
<?php }} /* 單面頁循環結束 */ ?>
<?php
/* 博客分類 aabbj.com*/
$terms = get_terms('category', 'orderby=name&hide_empty=0' );
$countcount = count($terms);
if($count > 0){
foreach ($terms as $term) { ?>
<url>
<loc><?php echo get_term_link($term, $term->slug); ?></loc>
<changefreq>weekly</changefreq>
<priority>0.8</priority>
</url>
<?php }} /* 分類循環結束 */?>
<?php
/* 標籤(可選) */
$tags = get_terms("post_tag");
foreach ( $tags as $key => $tag ) {
$link = get_term_link( intval($tag->term_id), "post_tag" );
if ( is_wp_error( $link ) )
return false;
$tags[ $key ]->link = $link;
?>
<url>
<loc><?php echo $link ?></loc>
<changefreq>monthly</changefreq>
<priority>0.4</priority>
</url>
<?php } /* 標籤循環結束 */ ?>
</urlset>
|
将以上代码保存为sitemap.php,上传到网站根目录,并重写服务器根目录下的.htaccess,在第一行加上一句代码:
RewriteRule ^(sitemap)\.xml$ $1.php
|
这句代码的意思是将php 文件重写为xml 文件,ok,xml 制作完毕。
至此,xml 版本的html 版本的站点地图已经制作成功。再次提醒大家,我们在制作过程中要注意两个sitemap.php 上传的目录是不一样的,不要弄混淆。
下来我们就去百度提交我的网站地图xml格式的, 就是第二个方法制作的!
打开百度搜索资源平台自己注册,提交站点,验证https就不多说了,我去点资源提交-链接提交
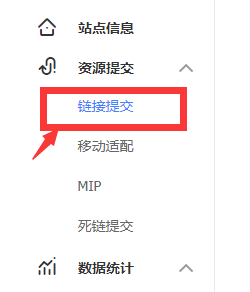
然后在右边点选自动提交-sitemap 然后在下面填写刚才你第二次建立的sitemap.xml文件地址例: https://aabbj.com/sitemap.xml 提交-完成。
现在我们去谷歌搜寻管理,(登录-提交自己站点的略过!)
我点点选右边的 索引-sitemap
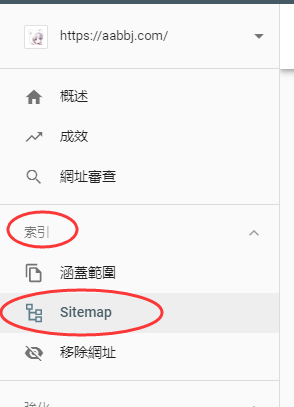
然后在右边提交你的sitemap 的地址,你的域名已经本身被填好!

例如: https://aabbj.com/sitmap.xml 你只需在后面填写 sitmap.xml 提交即可!
骚年,等待被收录吧,速度大大的提升